
9
Starting from version 1.9, the NetUP.tv client is installed as a default launcher for NetUP Android IP STB. If necessary, the NetUP.tv client can be installed on Android set-top boxes from other manufacturers.
Follow these steps to install the NetUP.tv client:
–upload *.apk file to a flash drive and connect it to an STB. Before that, allow the installation of applications from external flash-drives in the STB settings;
–install NetUP.tv client and allow it to run as a default launcher.
At first launch, you have to activate an STB. Follow these steps to do it:
1.Select a language in the menu.
2.Select one of the NetUP.tv client mode:
–Internet TV – the set-top box is connected to the provider’s IPTV middleware server over the Internet;
–Local TV – the set-top box is connected to an IPTV middleware server available in the provider’s local network;
|
|
For correct operation of the system in the Local TV mode the Middleware server must be used as its DNS server. If a different DNS server is used, it must be set up to resolve the.iptv zone to the Middleware address, and also to include it in the list of default suffixes for substitution |
–Free mode – there’s no connection to an IPTV middleware server.
–if you select ‘Internet TV’, you should enter the provider ID (it is assigned by NetUP), the card number and PIN which are stored in the customer account (for more info, see Customer’s personal account page);
–if you select ‘Local TV’, you should enter the card number and PIN which are stored in the customer account;
–if you select ‘Free mode’, you should not enter any data and can immediately go to the main menu.
After successful activation and the next time you turn on the device, the STB loads the main interface screen that displays the main menu and the home page
|
|
You can activate an STB using customer’s login and password. Open the Settings page in the web interface (the Android client group) and turn on the Activate STB with login/password flag (for more info, see Settings) |
.
|
|
If the activation number has been entered incorrectly 10 times, further attempts will be blocked for 1 hour. You can retry after the requests counter is automatically reset or you can reset it manually (for more info, see Reset the counter of activation requests) |
An automatic firmware update is available for NetUP Android IP STBs. An STB checks for updates when it is turned on or 1 hour after the previous check. If an update is available, it shows the following notification:
When the download is complete, it shows the following notification:

Before starting an update, the STB will reboot, and after installation, the device will operate as usual.
1.Upload a firmware file to a storage device in the root directory.
2.Connect it to an STB, then go to the Apps menu and run the Upgrade application.
3.Select the firmware update file in the Local Update.
|
|
If the firmware file is uploaded to the root directory of the storage device, but it is not displayed in the file list, press the Menu button on the remote control 9 times |
4.After installation, the STB will reboot.
|
|
If the STB does not boot and is stuck at start screen after an update, try reinstalling Firmware in the Recovery mode (Firmware upgrade in recovery mode) |
1.Connect to the Middleware server via ftp. Use custom_firmwares as login.
2.Go to the android directory and create the Amlogic-stvs9 directory or the Amlogic-p2121113 directory. The directory name depends on the STB model used.
3.Upload the firmware file to the created directory.
4.Press the Menu button on the remote control and select Check for updates. Then press Upload and Install to set up the firmware.
5.Before starting an update, the STB will reboot, and after installation, the device will operate as usual.
Turn on an STB and you will see the main interface screen of the NetUP.tv client. The upper part of the screen displays date, time and network status. The main part of the screen is the home page. Use the web interface to configure and edit the home page (for more info, see Home page). The bottom part of the screen displays the main menu which can be also configured and edited via the web interface (for more info, see Main menu).
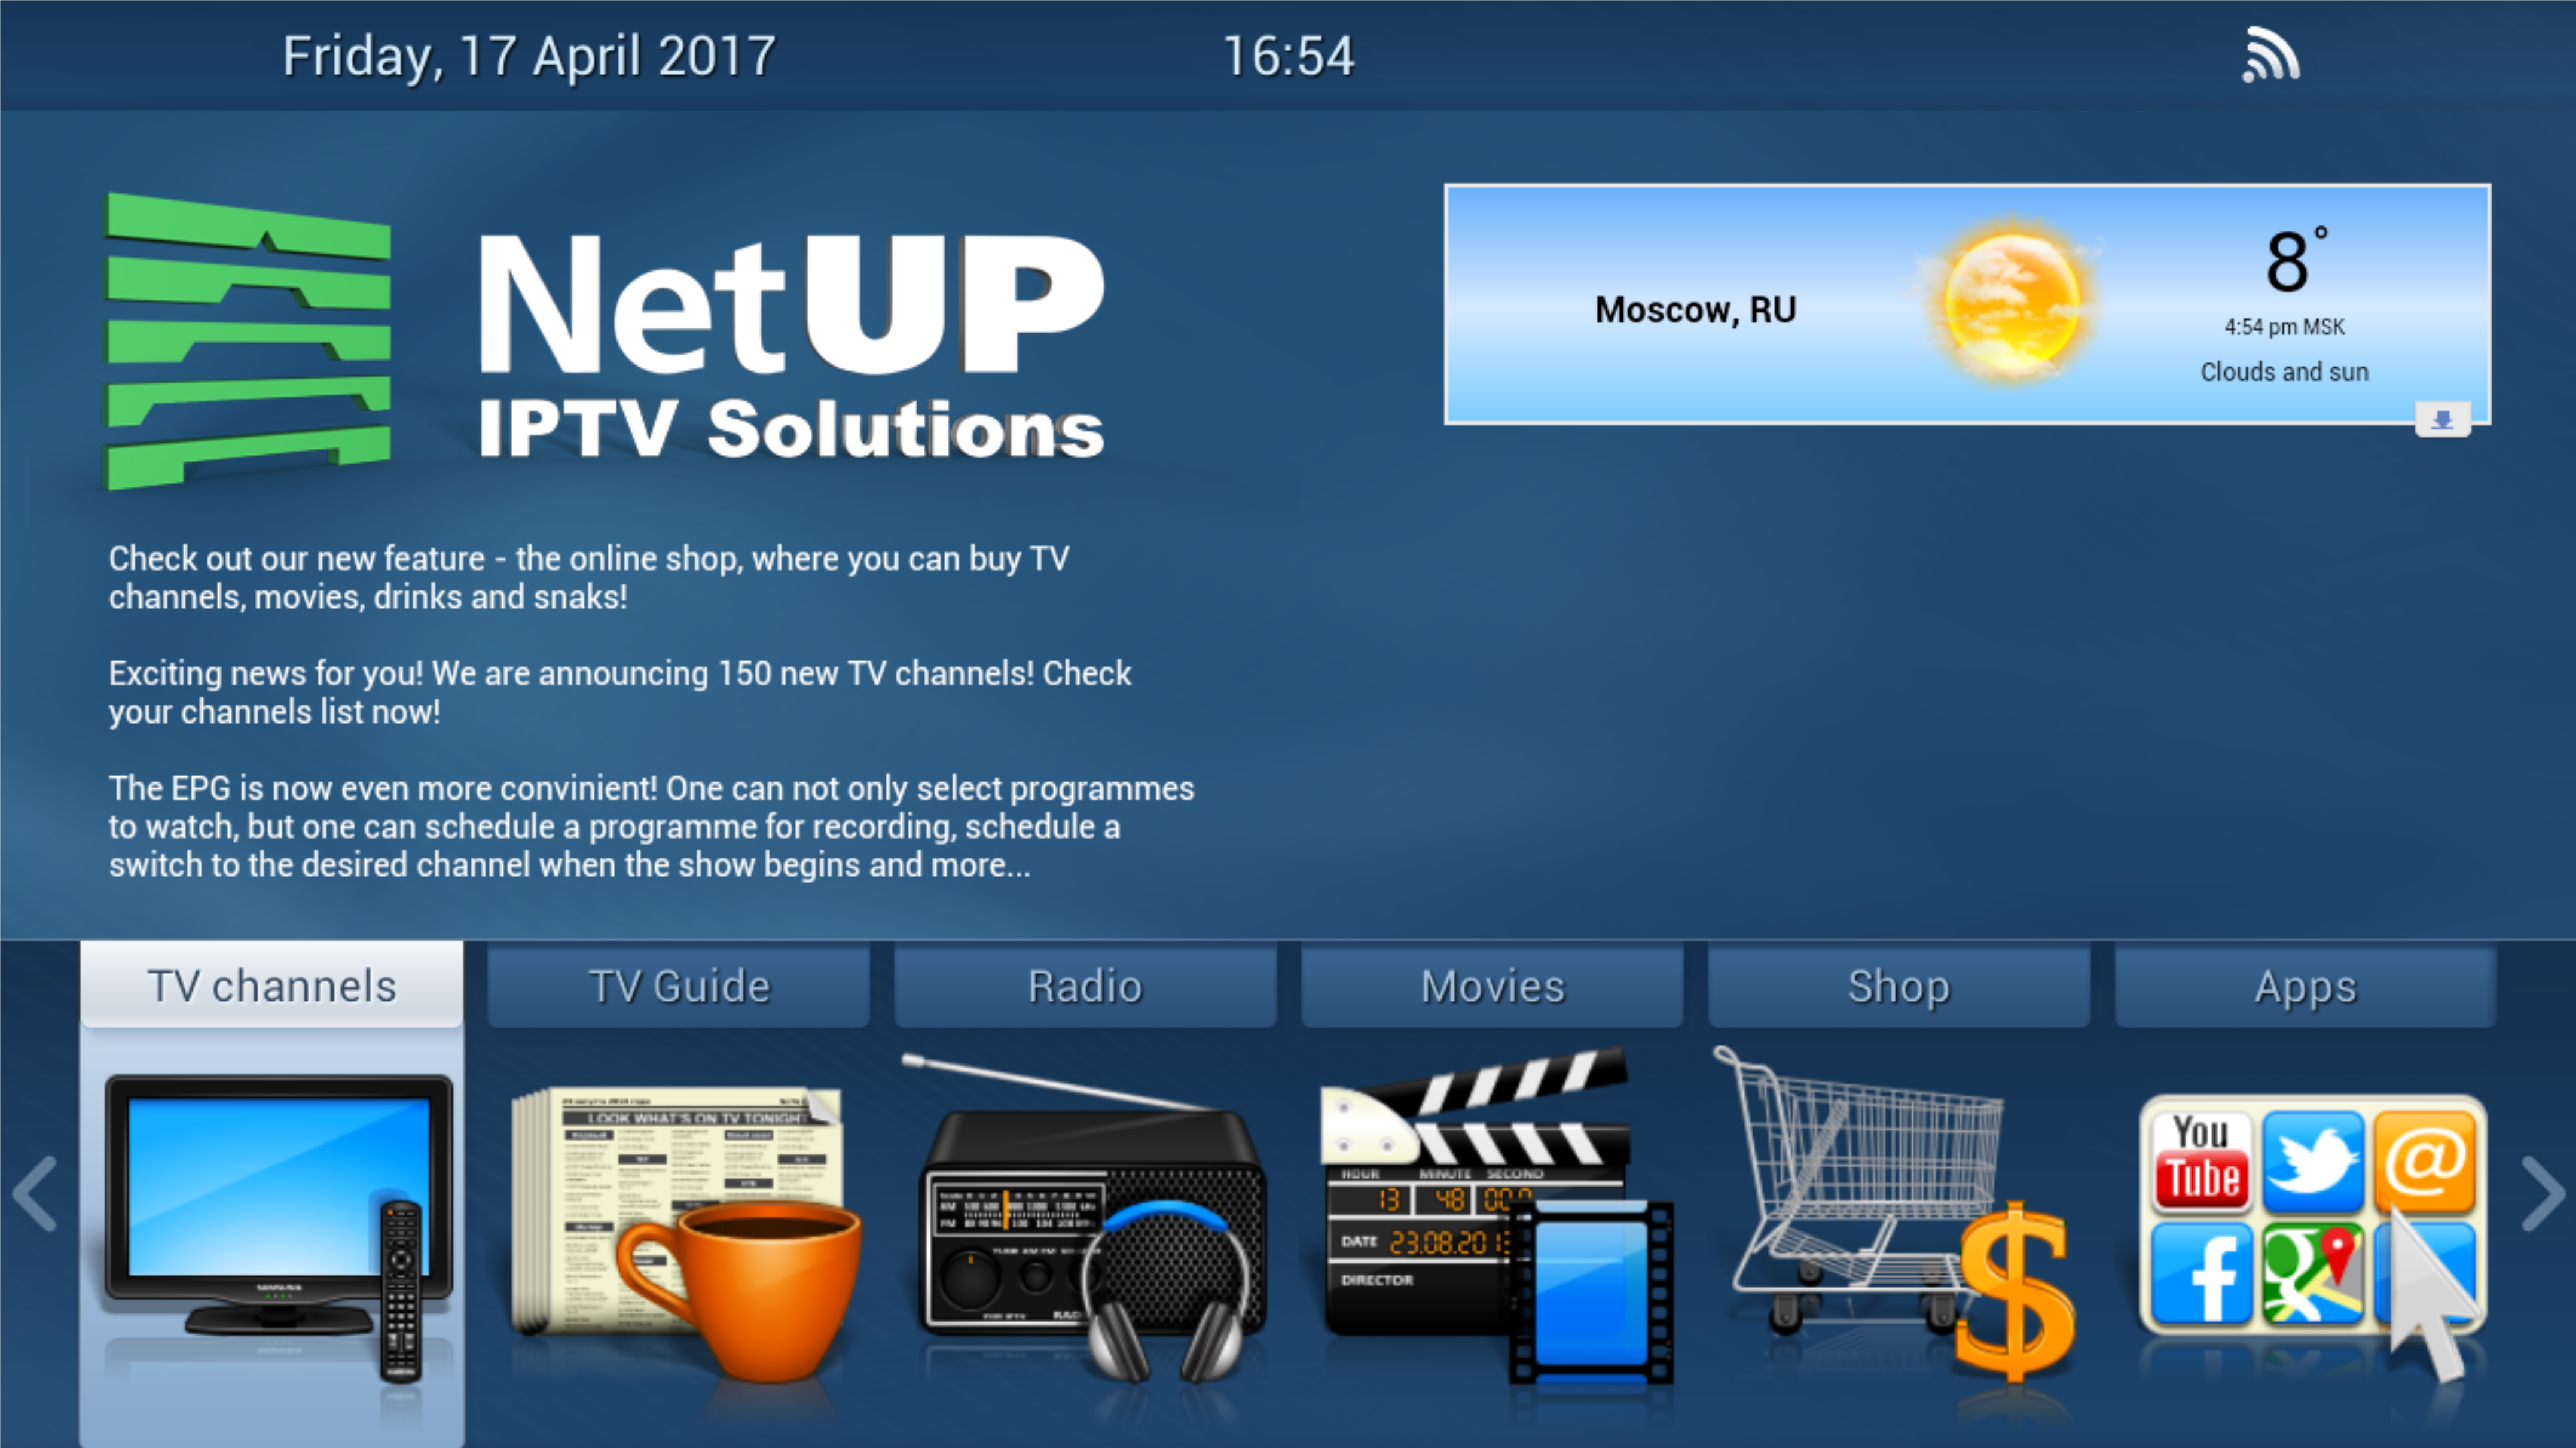
The main menu can include following items:
–TV channels– the list of TV channels
–TV guide– a TV guide (EPG)
–Radio– the list of available radio channels
–Movies– the list of purchased media content
–Shop– the list of media content and services that can be purchased
–Applications– the list of available Android applications
–Info– the page with additional information
|
|
The names of the main menu items, their number and order depend on the configuration of the NetUP.tv system and the settings saved in the web interface on the Main menu page |
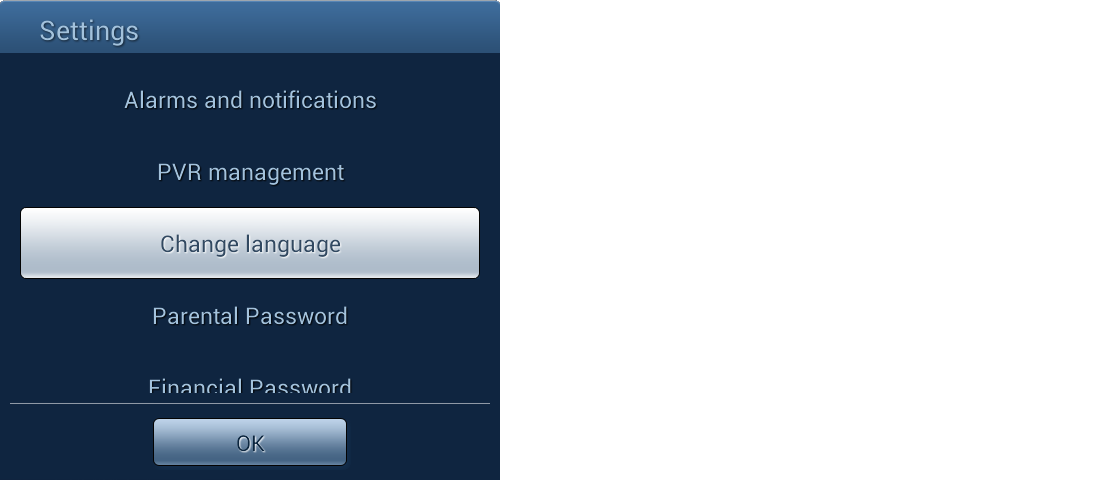
Click the Menu on the main interface screen to open the additional menu. This menu contains following items:
–Alarms and notifications – opens the page where you can manage alarms or delete notifications. For more info about adding notifications, see Alarms and notifications
–PVR management – opens the page for managing PVR recordings (watch or delete a video). How to record a video, see TV guide
–Change language – opens the page where you can select a language for the interface (this section can be added to the main menu)
–Parental password – opens the page where you can set a password for watching adult content (determined by the name of the content genre). The password must be entered before playing back content
–Financial password – opens the page where you can set a password for any financial transactions (purchase of content, change of service plan, etc.)
–Check for updates – allows you to check for updates manually
|
|
Automatic check is performed once an hour |
–System settings – opens the page with Android system settings
–Logout – allows you to log out of the account. This item is displayed if an STB was activated using the login and password
|
|
If you have been logged out, the next time you turn on the STB, you need to select the NetUP.tv client mode and enter the login and the password to connect the device |
–System data – displays the firmware version, IPTV Launcher version, STB model and IP address
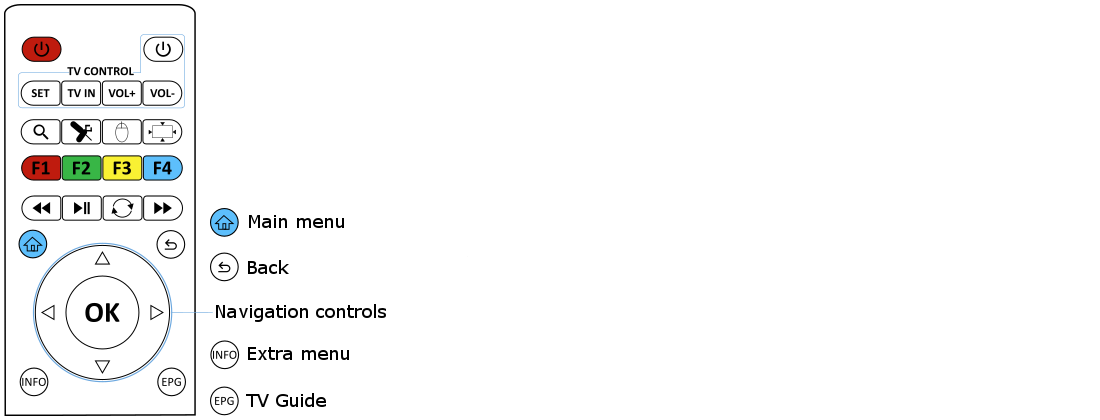
Use the STB remote control to navigate through the menu items. Use Up / Down, Left / Right and Back buttons to select a menu item. Press OK to move to the selected item. For example, you can use following buttons on the NetUP Android IP STB remote control to navigate:
The TV channels page displays the list of available TV channels. The list of TV channels depends on the customer’s service plan (see Create a service plan).

Press Right on the remote control to maximize the list. Use navigation buttons to select a channel and press OK to switch to it.
If a number has been assigned to the channel in the web interface (the Number field is filled in the TV channel profile), enter this number using the number keys on the remote control (see Add a TV channel).
Press INFO during playback to show the TV playback menu. This menu contains following items:
–Pause – pause the playback. It automatically starts recording the video stream and starts playing back the recorded piece when the TV channel is unpaused. During playback of the recording, you can pause the channel again, as well as rewind forward or backward within the recorded fragment.
Press Back on the STB remote control to return to watching the TV channel in real time
|
|
You must connect an external USB drive or SD memory card to the set-top box to use this feature. The capacity of the external drive should be at least 16 Gb |
–Aspect ratio – adjust the aspect ratio
–Audio streams – choose an audio stream
–Program guide – open the window with a TV guide, where you can find what’s coming next on the current channel
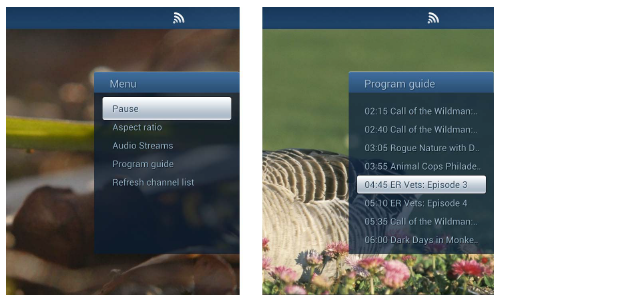
The TV guide page displays program guide for those channels for which it is available. Upload the program guide via the web interface if you want it displayed on this page (see Upload a program guide (EPG)).
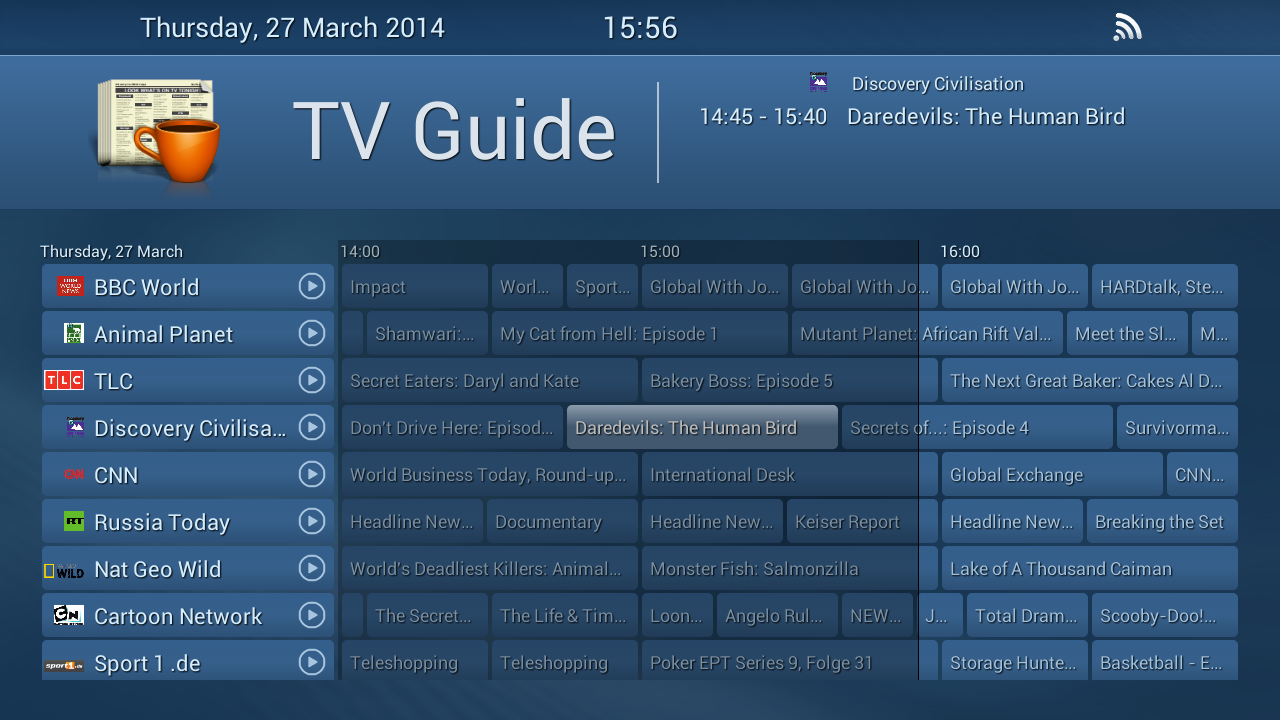
Use navigation buttons to select a channel and a program, then press OK to switch to the program.
|
|
If an ‘Access to records of TV channel’ service is attached to a customer, the customer can select and watch recordings from this channel |
The channel included in the Access to records of TV channel service has a special icon in the STB interface 
Select a program that has not started yet, click OK on the remote control and select one of the following options in the opened window:
–Switch to channel when the selected program starts
–Show notification when the selected program starts
–Record program to set up the program recording
|
|
Connect an external USB drive or SD memory card to the set-top box to be able to record |
After selecting any of the options, the corresponding note will be added to the Alarms and notifications list (see Alarms and notifications).
The Radio page displays the list of available radio channels. The list of radio channels depends on the customer’s service plan (see Create a service plan).
The Movies page displays the list of purchased and available for watching media content. You can purchase movies here - Shop.
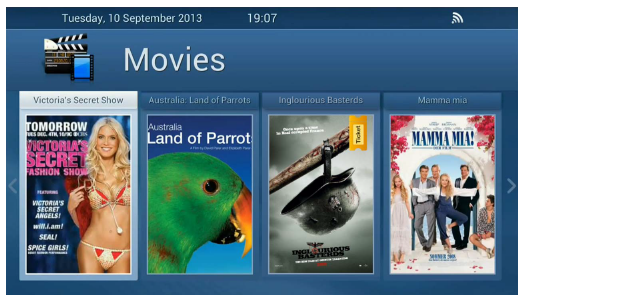
Use navigation buttons to select a movie and press OK to start playback.
–press Left or Right to rewind forward or backward,
–press INFO to open the additional menu. Use this menu to adjust the aspect ratio, to select an audio stream or to turn on subtitles.
The Shop page displays the list of items, services and content that customers can purchase.
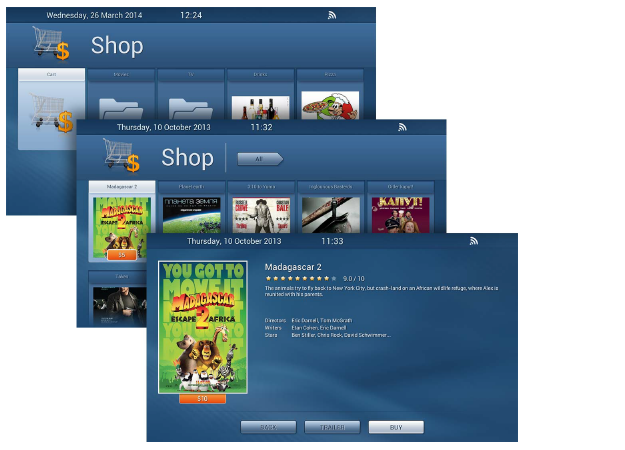
Items and services are displayed in the order fixed on the Shop page in the web interface (for more info, see Shop).
Go to the Movies folder to see purchased video files and to the TV folder to see pay-TV channels to which access was open. How to add a content to the Shop, see Add a TV channel and Create a VOD content (a video, a movie).
Use navigation buttons on the remote control to navigate through folders in the section. Press OK to open the selected folder or see an item description or add an item to cart.
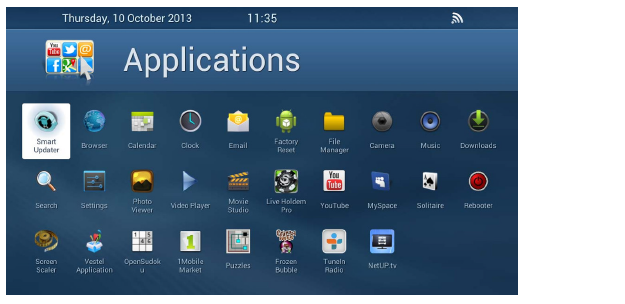
The Applications page displays the list of available Android apps:
The Messages page displays messages sent by hotel staff through the web interface (see Rooms).
The Info can display any additional information. Use the web interface to configure and edit the info page (for more info, see Info page).
On a web-portal page (i.e. Hotel info, or Room vacant) triple press Menu button on the STB remote control to change room status to one of the following:
–The room doesn’t need a clean up
–The room needs a clean up, but is occupied at the moment
–The room needs a clean up and is empty at the moment
On the NetUP.tv client interface main screen, press the button that opens the additional menu. In the opened window, select Alarms and notifications.
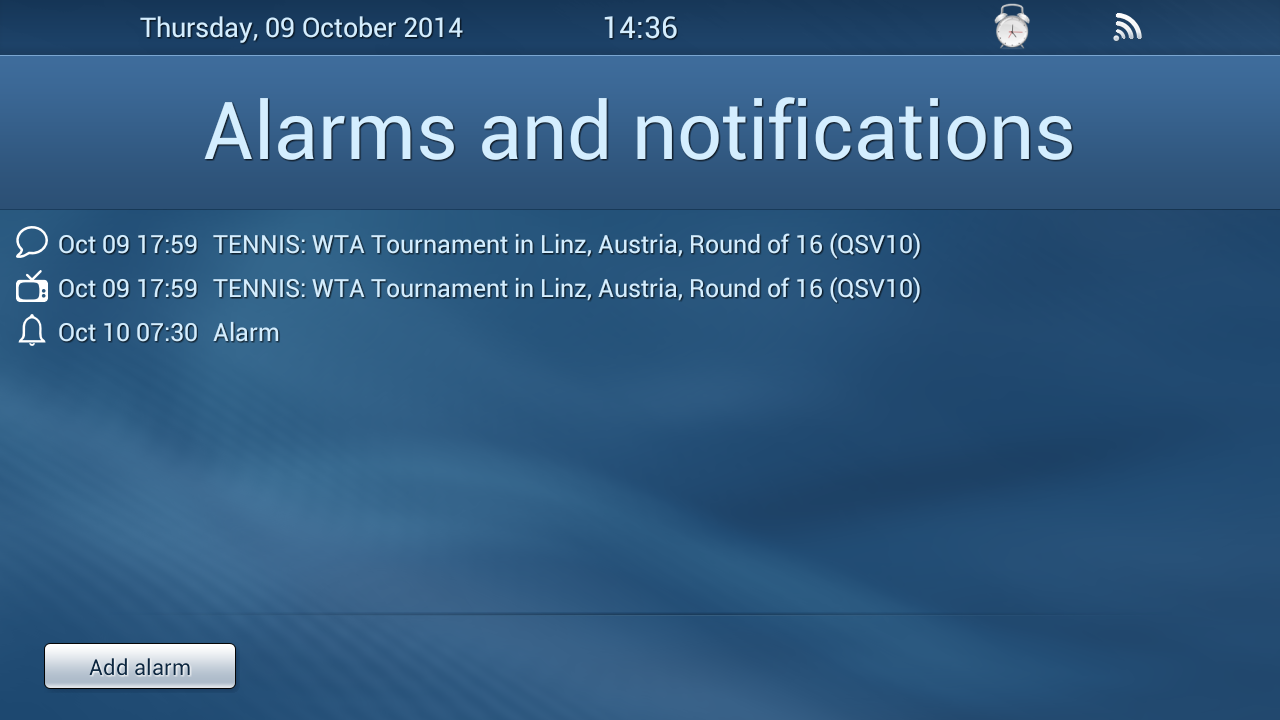
This menu displays the list of scheduled events:
 – notifications about switching the channel to the beginning of a program
 – notifications about the beginning of a program
Notifications are added to the list if you select them from the menu on the TV guide page (for more info, see TV guide).
Click Add alarm, set time and press OK. The added alarm will be displayed on the page and on the top panel of the screen.
Select an alarm or a scheduled event from the list and press ОК on the STB remote control. In the opened window, click OK to delete the alarm or the event.
 – alarms