
6
|
|
See the description of web interface pages here: DVB to IP gateway and Input settings |
1.Open the DVB to IP gateway page (the Streaming group) in the web interface.
2.Click Expand input on an input panel. If the input signal is not configured or turned off, the expanded panel displays only adapter settings. If the input signal is enabled, click Expand input settings to show the adapter settings panel.
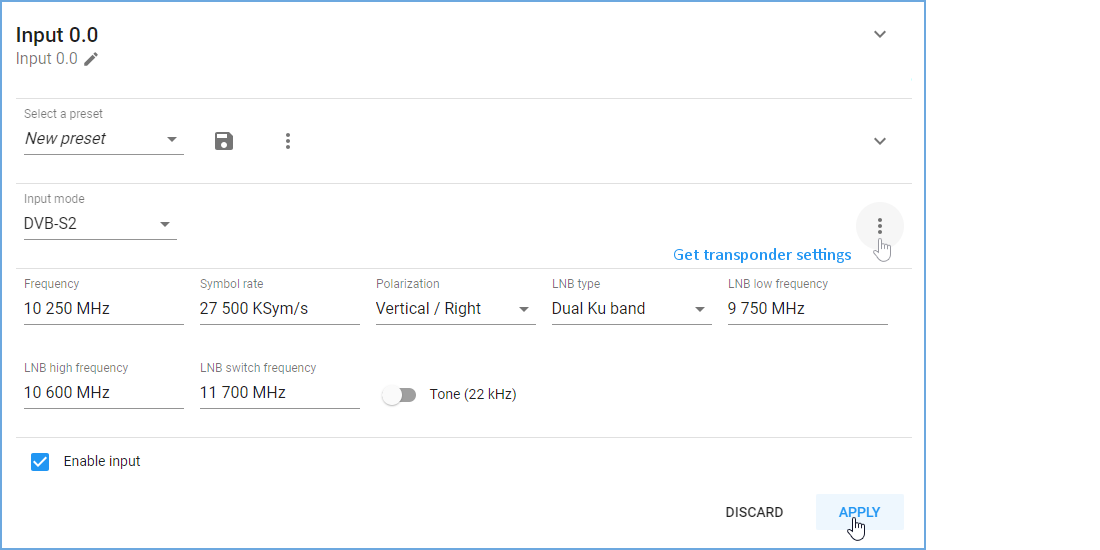
3.Set the input parameters in one of the following ways:
–manually – select Input mode (DVB-S, DVB-S2, DVB-T, DVB-T2, DVB-C Annex A, ISDB-T) and fill in all the parameters. Each of Input modes has its own set of parameters, and the list of available modes depends on the DVB adapter type. For more info, see Input modes
–get settings from satellite database or browse network – click Get transponder settings button on the right and select the option: Satellite database or Browse network. In the opened window select one of the available transponders to fill in its parameters in the form
|
|
Browse network is available for DVB-S and DVB-S2 |
–upload settings from preset – click Select a preset and choose one from the list. The preset settings will be displayed in the form. If necessary, you can change parameter values
|
|
Changing parameter values in the web form does not affect the preset. For more info, see Configure an input using a preset |
4.Turn on the Enable input flag.
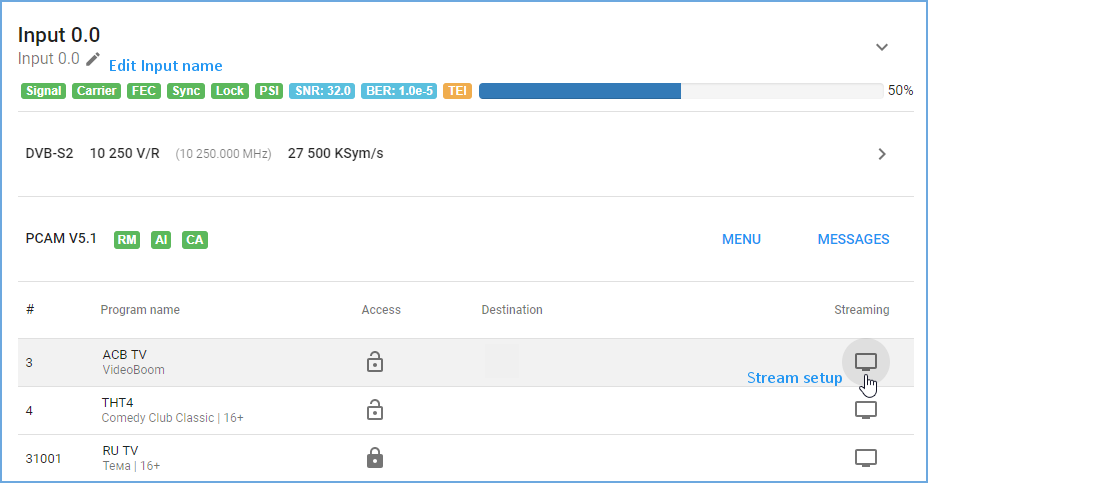
5.Click on Apply button to active the settings. As a result, the panel displays input signal quality indicators and the list of programs for the selected frequency.
|
|
If you use a preset to set up an input, click on Apply and choose one of the actions: Apply input settings or Apply both input and streaming settings, because the preset can store not only the parameters to configure the input, but also the parameters to configure output streams. |
|
|
See the description of web interface pages here: DVB to IP gateway and Input settings |
1.Open the DVB to IP gateway page (the Streaming group) in the web interface.
2.Click Expand input on an input panel and then click Expand input settings.
3.Select the New preset from the preset list.
4.Fill in the transponder parameters manually or by selecting from the available list (for more info, see Configure an input), set up other input parameters and click on Apply. As a result, the panel displays input signal quality indicators and the list of programs for the selected frequency.
5.Set up streams and then save the preset. Parameters of all configured streams will be saved into the preset. For more info, see Set up streaming
|
|
If you only need to save the input settings in the preset, skip this step |
6.Click on Save preset. In the opened window, write Preset name and click Save.
7.If you need to edit a preset, select the preset from the list, change settings for the input or the streaming or both, apply the changes and then click Save preset. In the opened window, you can save changes and rename the preset.
|
|
See the description of web interface pages here: DVB to IP gateway and Input settings |
1.Open the DVB to IP gateway page (the Streaming group) in the web interface.
2.Click Expand input on an input panel. If the input signal is not configured or turned off, the expanded panel displays only adapter settings. If the input signal is enabled, click Expand input settings to show the adapter settings panel.
3.Select a preset from the list and the web form displays the parameters saved in the preset. If necessary, you can change parameter values.
|
|
Changing parameter values in the web form does not affect the preset. How to modify it, please see Create and edit a preset |
4.Click Load or Apply => Apply input settings to active the settings from the preset. As a result, the panel displays input signal quality indicators and the list of programs for the selected frequency.
|
|
If a preset stores only input settings, the web form displays Load. If a preset stores input and streaming settings, the web form displays Apply |
|
|
Input settings and streaming settings from the same preset are downloaded separately |
5.Click Apply => Apply input settings and the bottom part of the panel will display the streams which were saved in the preset.
|
|
When loading the streaming settings, the system compares addresses of the existing streams with stream addresses that need to be downloaded from the selected preset. If the system finds identical addresses, it will generate an error and stop broadcasting streams that were downloaded from the preset |
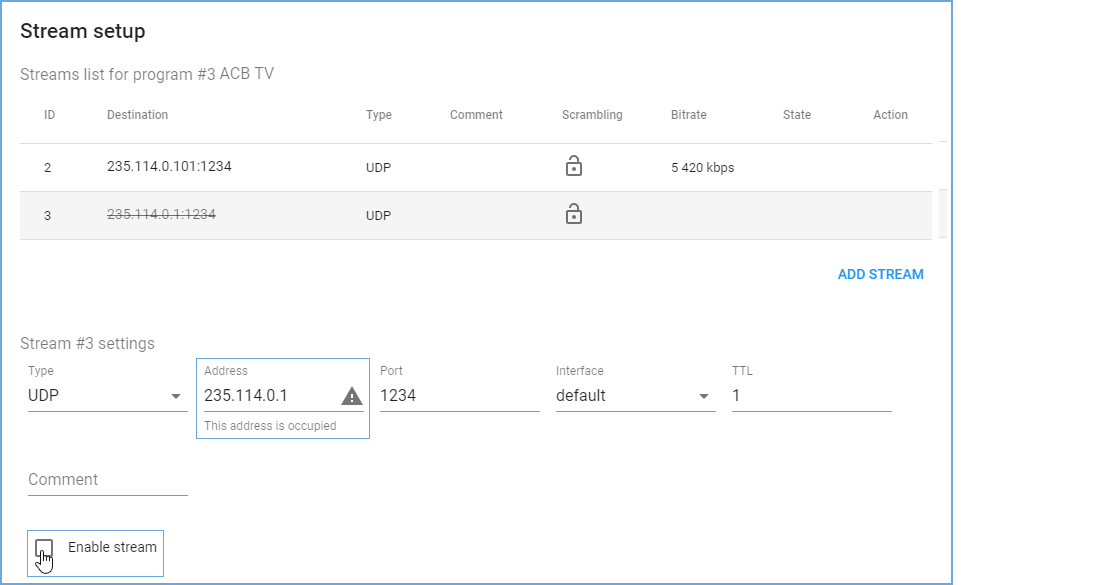
6.Check the stream addresses and change their settings or enable streams manually. To do it, open the Stream setup window, select a stopped stream, change its Address, then turn on the Enable stream flag and click on Apply button.
|
|
For more info, see Set up streaming |
|
|
See the description of web interface pages here: DVB to IP gateway and Input settings |
1.Open the DVB to IP gateway page (the Streaming group) in the web interface.
2.Click Expand input on an input panel. If necessary, configure the input. For more info, see Configure an input
3.In the program list, opposite the program, in the Streaming column, click on the button to open the Stream setup window.
|
|
The Stream setup window is divided into two parts: Stream list and Stream settings |
4.In the opened window, in the Stream settings, select a stream Type and set up the other parameters. Each type of stream has its own set of parameters.
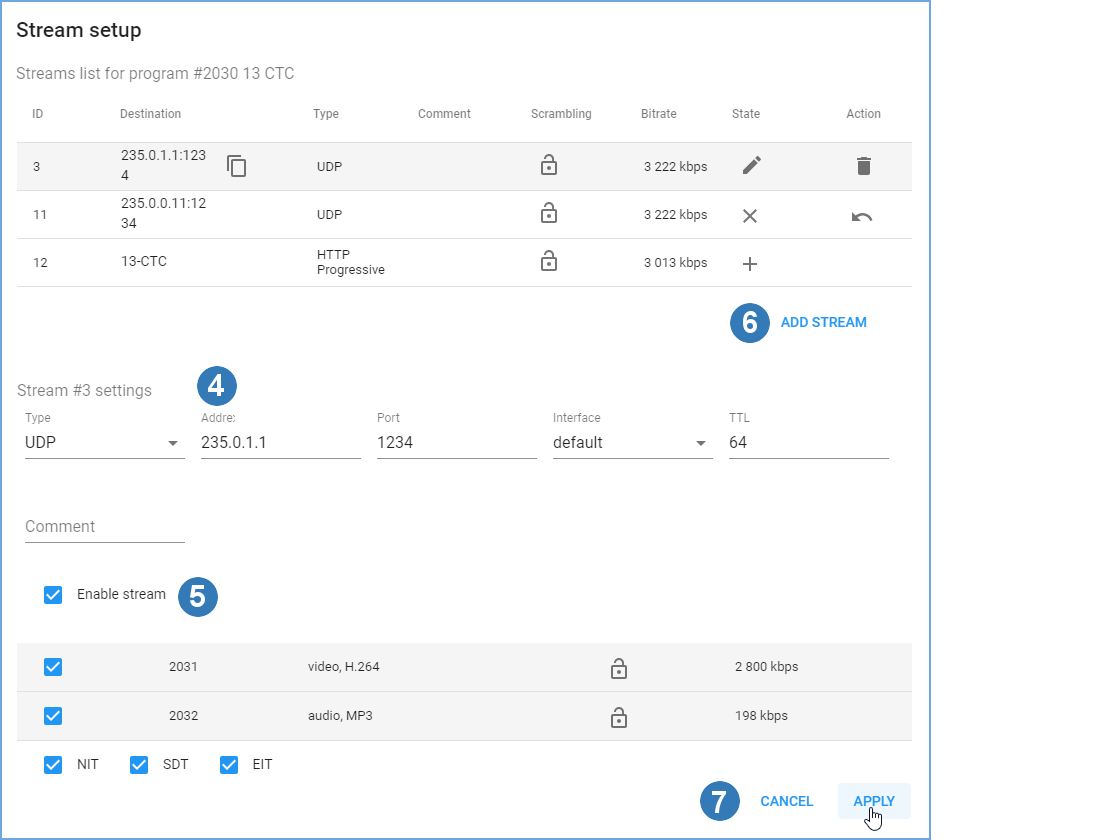
5.Mark flags in front of PIDs and service tables (NIT, SDT, EIT) that you want to include in the stream.
6.Click Add stream, if you need to add another stream for the selected program, and repeat the steps number 4 and 5.
|
|
If you need to add several streams of the same type for one program, we recommend adding a two-digit number in the Address field to the last digit in the fourth octet, which is one more than the previous one, for example, if the address of the 1st stream is 235.114.3.1, then for the 2nd stream, the address can be 235.114.3.1 01, and for the 3rd one – 235.114.3.1 02. In this case it is easier to avoid IP address conflict |
7.Click Apply, if you want to save changes or click Close to close the window without saving changes.
|
|
Turn on the corresponding option in the user interface options to edit streams for one program in a single dialog (see Interface options). |
8.If you want to edit a stream, click on a line with stream’s parameters in the Streams list to select one and make changes in the Stream settings. The State column in the Streams list displays a pencil opposite the stream that has been changed. Click Apply, if you want to save changes or click Close to close the window without saving changes.
|
|
See the description of the web interface page here: TV Channels |
1.If necessary, configure the input and set up streams (see Configure an input and Set up streaming).
2.In the web interface, open the TV Channels page (the Media content group). Click on Add button and in the opened window write a name for a new TV channel, then click OK.
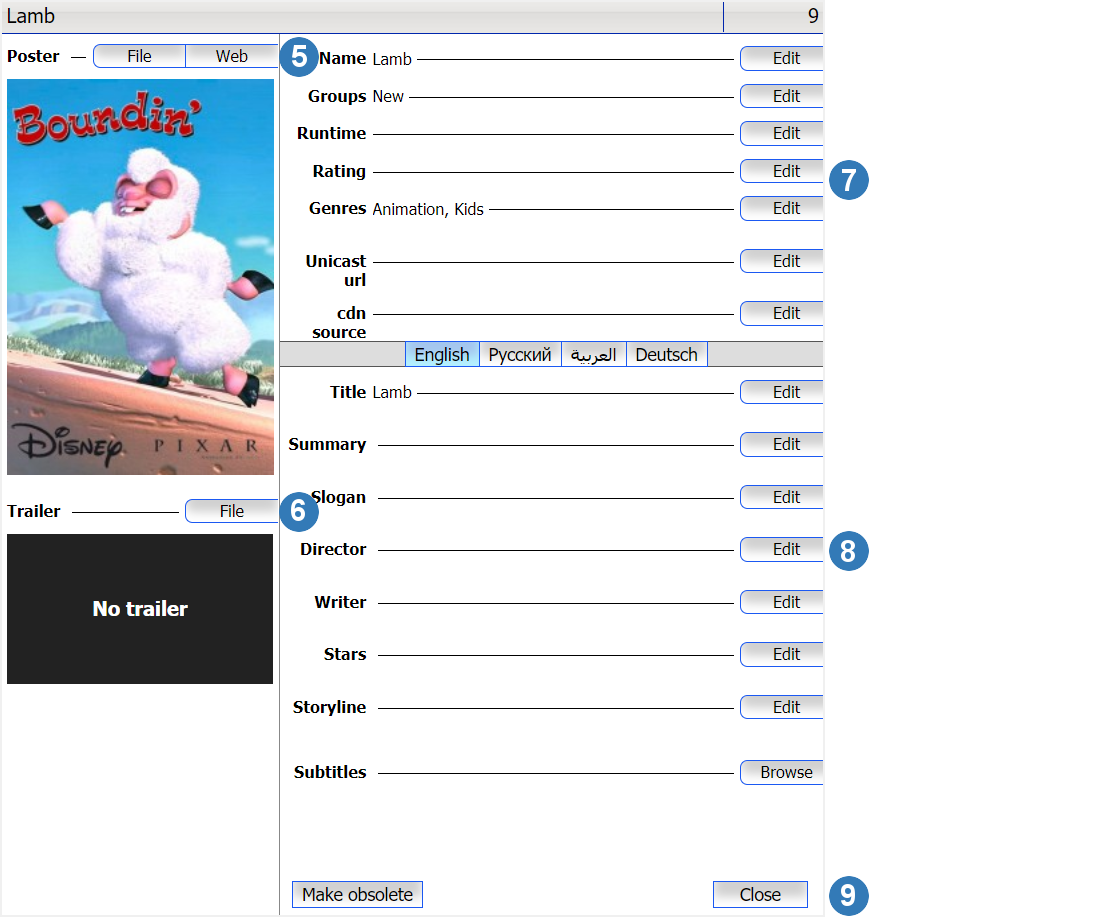
3.Click on the created TV channel profile to open the profile edit window.
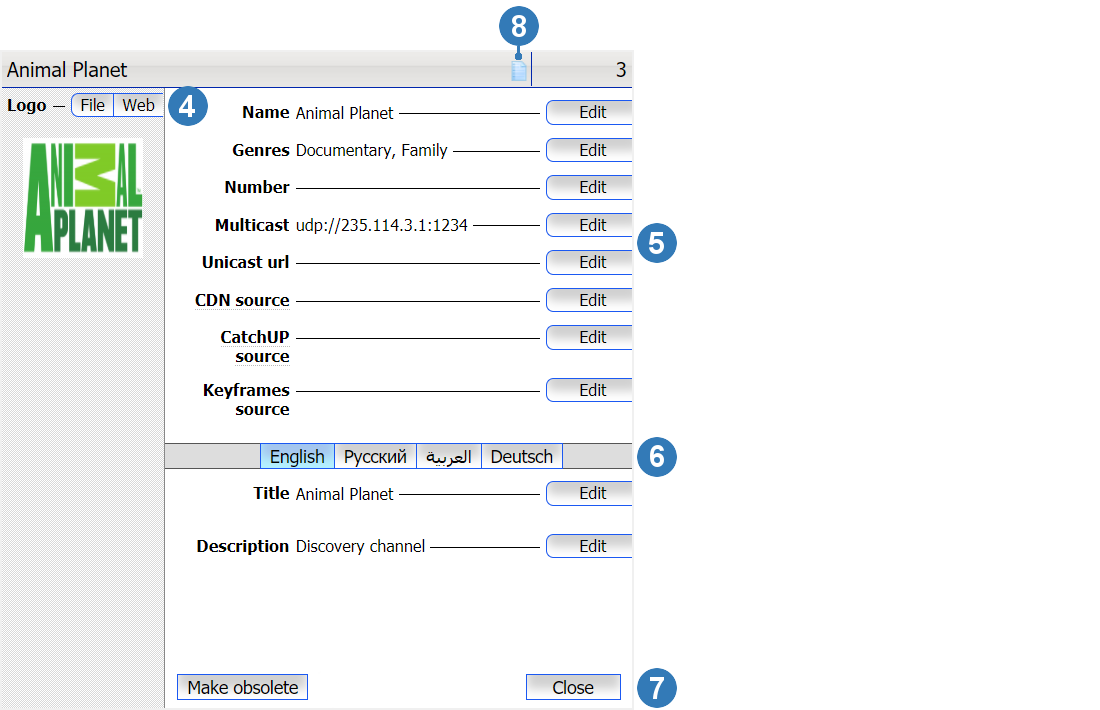
4.Use File or Web under Logo and upload the channel logo image from a local file or an URL.
5.Click Edit next to the parameter you want to change. In the opened window set parameter values and click ОК.
6.Select a language and write a description of the channel. You can add descriptions in those languages that were added on the Languages page (the Media content group).
7.Click Make obsolete to remove a channel from the list of available channels or click Close to close the profile edit window.
8.On top of the profile edit window, opposite of the channel name, click on the Media program icon. The opened page shows a program guide for the channel, if it has been downloaded. You can create the program guide manually. Click Add to create a schedule item. Each item has the following parameters:
–Program code - a unique program identifier

|
|
The schedule is intended to be displayed in the STB interface along with the other channel-related information (description, etc.) during channel selection |
9.Open the Service plans page (the Billing group) in the manager web interface and select the service plan to which you want to add the TV channel. Click on Add service button and select one of the service types: TV channels or TV channels in record. In the opened window, select the created media content, fill in the other fields and click Save. For more info about adding services to a service plan, see Create a service plan
|
|
When adding a service to a service plan, turn on the Additional service flag, if you want that the TV channel associated with the service will be displayed in the STB interface, in the Shop section, in order for a customer to buy the access to this channel for an extra fee |
|
|
See the description of the web interface page here: EPG |
1.Open the EPG page (the Media content group) in the web interface.
2.Click Add url to upload a program guide (EPG) from an URL or click Add file to upload it from a .xmltv file. In the opened window, fill in the fields and click Save.
|
|
If you upload the EPG from the URL, you can set the automatic update – weekly or daily |
|
|
Uploading the EPG by FTP is done in active mode. In case the server is connected to the Internet via NAT, the router must support active FTP mode |
3.Click Details under the EPG to expand the channel list.
4.Select channels available in your IPTV system, then use the drop-down list to select corresponding media content and click Save to activate the settings.
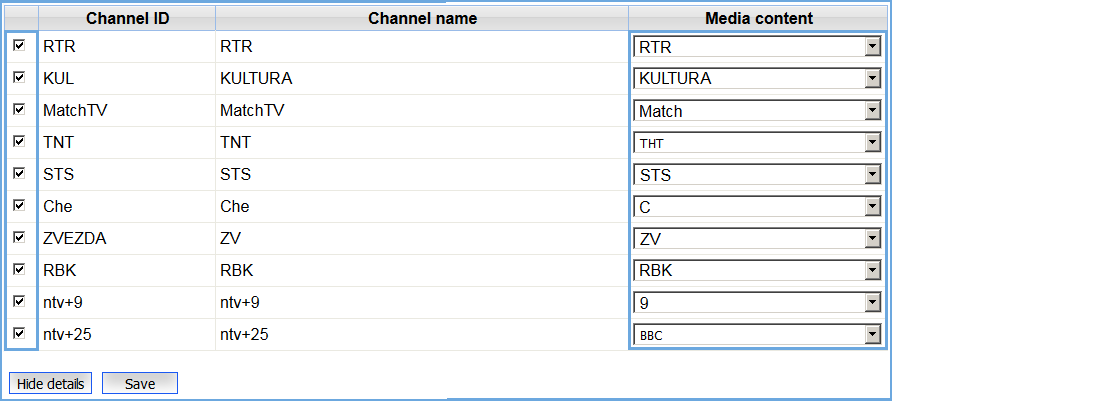
5.Open the TV Channels page (the Media content group), click on the media content associated with one of the channels and click on the Media program icon on top of the profile edit window, opposite of the channel name. If the opened window displays the program guide, it means that the EPG has been uploaded and configured successfully.
|
|
See the description of web interface pages here: Manage VoD content and Movies |
1.Open the Manage VoD content page (the IPTV distribution group) in the manager web interface and click Upload a video in the upper right corner.
2.In the opened window, select one or more files to upload and close the window when the upload is complete.
3.Find the downloaded file in the list on the page and click on it. In the opened Transcoding window follow these steps:
–write a media content name, which will be displayed in the web interface,
–select a transcoding profile, audio tracks that need to be included,
–click on Transcode button to add the file to the transcoding queue.

4.Open the Movies page (the Media content group) in the web interface and find the created media content. Click on the media content to open the profile edit window.
5.In the Poster block, use File or Web to upload image from a local file or an URL.
6.In the Trailer block, click File and upload a video trailer.
|
|
Upload a video trailer in MP4 (H.264 video and AAC audio) to play it on iOS mobile devices |
7.Click Edit next to the parameter you want to change. In the opened window set parameter values and click ОК.
8.Select a language and write a description of the video. You can add descriptions in those languages that were added on the Languages page (the Media content group).
9.Click Make obsolete to remove the media content from the list of available movies or click Close to close the window.
10.Open the Service plans page (the Billing group) in the web interface and open the service plan to which you want to add the VOD content. Click Add service and select Movies. In the opened window, select a transcoded content, set a price and a currency, then click Save. For more info about adding services to a service plan, see Create a service plan
|
|
A customer can purchase a VOD content, if the VOD content is included in the customer’s service plan |
|
|
See the description of web interface pages here: Media groups and Media content groups |
1.Open the Media groups page (the Media content group) in the web interface, select one of content type and click it.
2.On the opened page, in the upper right corner, click Create new media group. In the opened window write a group Name and click Save.
|
|
You can not delete a media group, you can only edit its name |
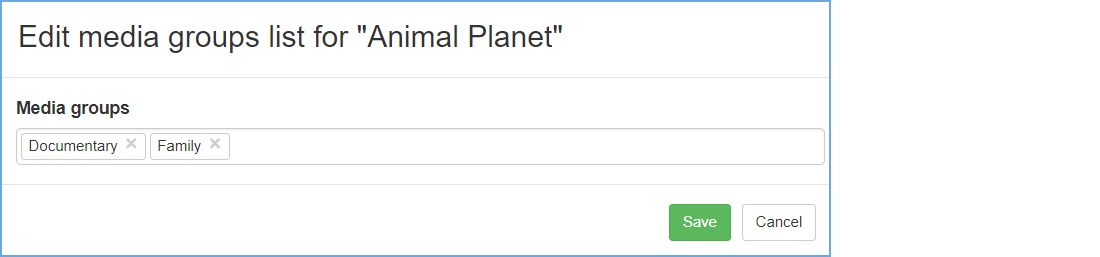
3.Open the Media content groups page (the Billing group), use the sorting and filtering to find a media content and click on it. If you want to add several items at once, check the corresponding boxes on the left and click Add to groups to combine content.
|
|
Check the corresponding boxes opposite of the content and click Remove from groups to remove selected items |
4.In the opened window, start typing a media group name, select a group from the drop-down list and click Save.
|
|
See the description of web interface pages here: Service plans and Service plan page |
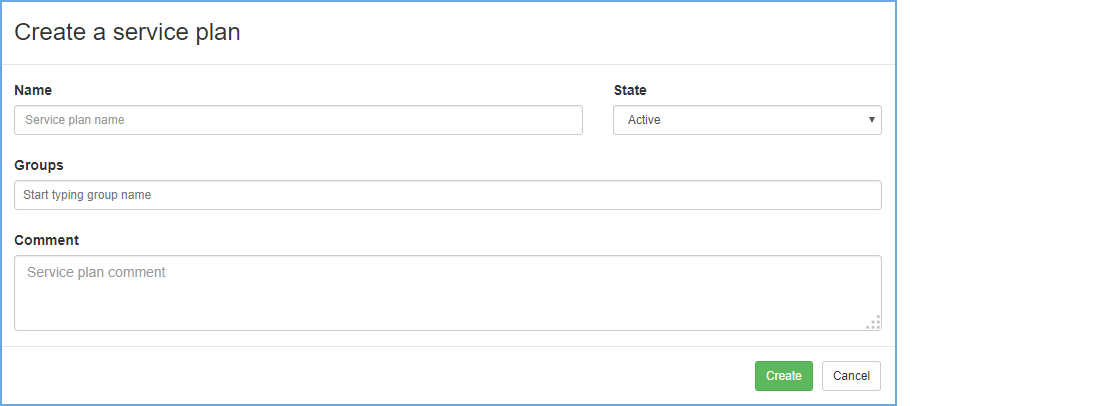
1.Open the Service plans page (the Billing group) in the web interface and click Create a service plan in the upper right corner.
2.In the opened window fill in the fields and click Create.
|
|
When creating a service plan, you can set the Being edited state. A service plan in this state can’t be attached to a customer. When finishing setting up a plan (when all of required services were added), change the plan state to the Active |
3.On the service plan’s page, click Add service and select the required service type from the drop-down list:
–Basic services: periodic and one-time;
–IPTV: TV channels, TV channels in record, movies, radio
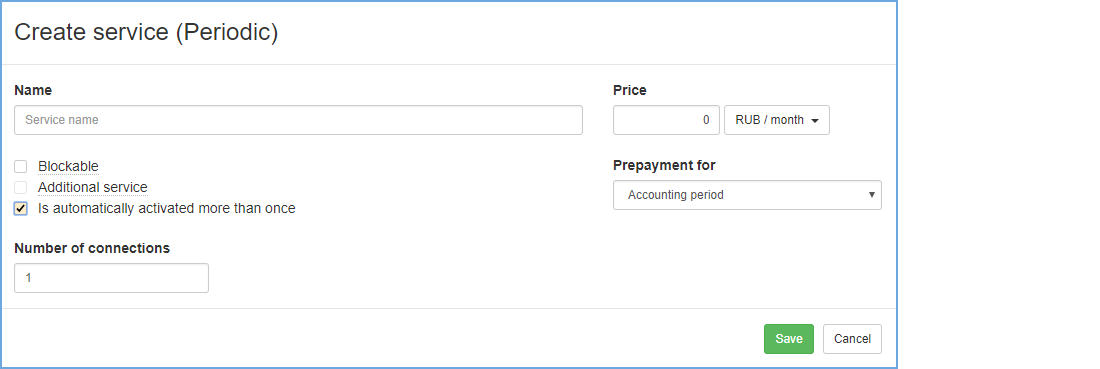
4.In the opened Create service window, fill in the fields and click Save.
–a name of the IPTV service is generated automatically and it includes a name of the selected media content or media group to which this service provides access and for Basic services, you must write the name on your own;
–price units in a Periodic service (i.e. USD / month, USD / day) affect the final cost and do not affect the frequency of charges for using this service. The frequency of charges is affected by the Prepayment for parameter
–a service price can be set in those currencies that were previously added on the Currencies page (the System group in the manager web interface);
–turn on the Blockable flag in a service, if you want to stop providing and charging the service when a customer’s personal account is blocked;
–turn on the Additional service flag, if you do not want to attach the service automatically with the service plan. A customer can add such service via the STB interface, in the Shop section, or you can attach it to a customer via the manager web interface, on the customer’s personal account page, in the service plan panel;
–if you add a group of TV channels to a service plan as an additional service, buying this group, a customer gets access to all the TV channels from this group;
–for movies (one or a group), you can add them to service plans only as additional services. That means, a customer has to buy them via the STB interface in the Shop section or via the NetUP mobile and the NetUP WEB interfaces. If a movie is in several groups, its price is calculated as the lowest price among those groups.
5.Add all the services to the created service plan, repeating steps 3 and 4.
6.Use buttons on the service’s panel to Edit, Delete service or Enable and Disable for multiple. You can enable or disable a service only for a multiple (group of personal accounts) which has attached the same service plan that includes the service.
|
|
You can not delete the service that was attached to at least one customer |
Standalone services can be attached separately of a service plan and only by NetUP.tv system users via the web interface.
|
|
See the description of the web interface page here: Standalone services |
1.Open the Standalone services page (the Billing group) in the manager web interface, click Add service in the upper right corner and select one of the service type from the drop-down list: Periodic or One-time.
2.In the opened window fill in the fields and click Create.
|
|
Turn on the Blockable flag in a service, if you want to stop providing and charging the service when a customer’s personal account is blocked |
3.Use buttons on the service’s panel to Edit or Delete the service.
|
|
You can not delete the service that was attached to at least one customer |
|
|
See the description of the web interface pages here: Customers |
1.Open the Customers page (the Customers group) in the manager web interface, click on the Add customer button in the upper right corner and select a customer type: an individual or an organization. In the opened window fill in the fields and click Create.
|
|
The password for a new customer is automatically generated and can be changed manually |
2.In the bottom of the custom info page click Create a new personal account.
3.In the opened window select a currency and write a personal account number, if it’s necessary, then click Create
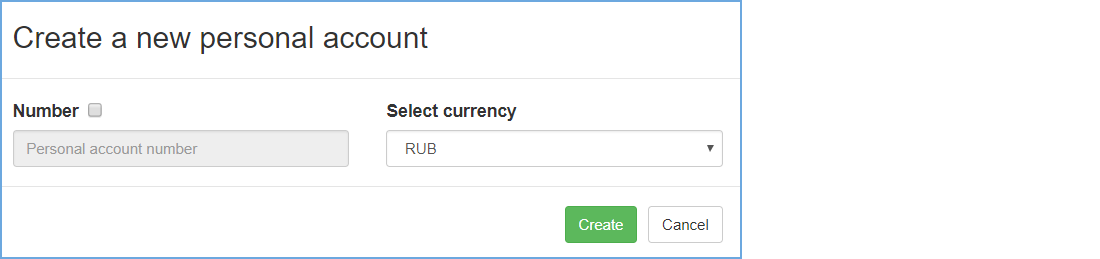
–the personal account number is automatically created, but for the hotel solution the personal account number must necessarily match the room number, so you must write it manually;
–if the list does not have the required currency, add it on the Currencies page (the System group)
–a customer can use Login and Password to login when the customer has at least one personal account
|
|
When you have added a personal account to a customer, you can activate an access card for this customer, make a payment to the customer account and attach a service plan and services |
|
|
See the description of the web interface pages here: Customers |
1.Open the Customers page (the Customers group) in the manager web interface, use sorting and filtering to find a customer and left-click on the line with the customer data.
2.On the Personal account page, in the right part of the Balance panel, click Menu and select Payment.
|
|
If you see the custom info page, the customer does not have a personal account. Create a personal account and then return to the payment operation. How to create a personal account see in the previous section |
3.In the opened window, fill in the fields and click Save.
|
|
See the description of the web interface page here: Customers |
1.Open the Customers page (the Customers group) in the manager web interface, use sorting and filtering to find a customer and left-click on the line with the customer data.
2.In the bottom of the Personal account page, in the right part of the Current service plan panel, click Menu and select Attach or Switch.
3.In the opened window, select the service plan, specify the Start date and the End date and then click Save.
–if you want to attach a service plan to a customer immediately, do not specify Start and End dates for the service plan;
–if a service plan switch is scheduled to a specific date, both plans will be shown on the customer’s personal account page in different panels - Current service plan and Next service plan;
–if you want to see the list of attached service plans, click Reports and select Attached services history on the upper right part of the Personal account page.
Connecting the STB at first time, a customer need to activate the access card with activation code (PIN and License key). The code is generated automatically after creating a personal account for the customer. If the customer needs to use another device with the same access card (for example, when the customer wants to use a new STB), generate a new activation code for the customer.
|
|
See the description of the web interface page here: Customer’s personal account page |
1.Open the Customers page (the Customers group) in the manager web interface, use sorting and filtering to find a customer and left-click on the line with the customer data.
2.In the right part of the Overview panel, click on the Menu button and select Access card to open the access card info window.
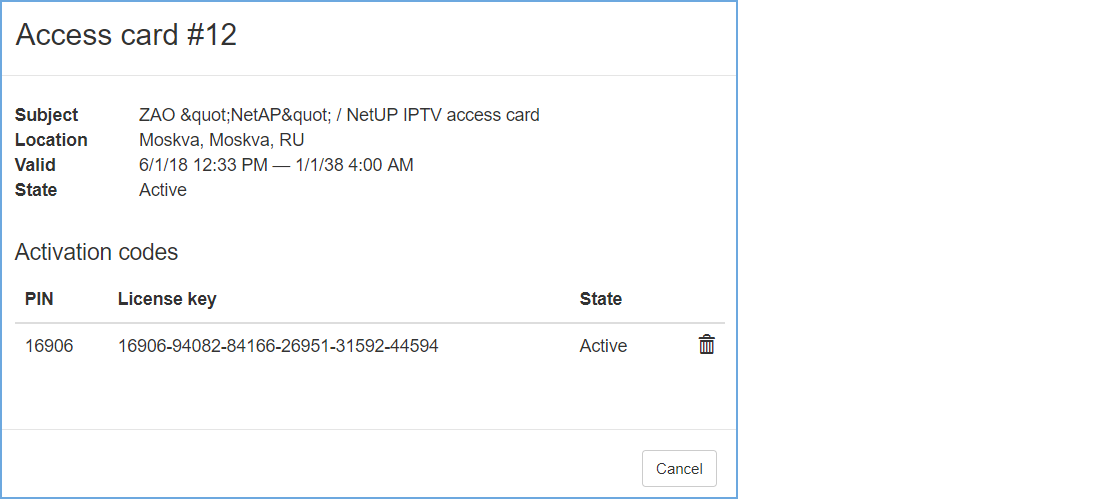
3.In the bottom part of the opened window, in the Activation codes panel, click Generate activation code. This function is available if the subscriber does not have activation codes or the code is assigned the status “USED”.
If 10 failed activation requests were received from one IP address, the further requests from this IP address will be ignored during the next hour. After one hour, the counter will automatically reset and you can try to activate a STB again. If you need to activate the STB faster, the NetUP.tv system administrator can reset the counter manually.
|
|
See the description of the web interface page here: Activation requests |
1.Open the Activation requests page (the Security group) in the manager web interface, use filtering to find an IP address, and left-click on it.
2.In the opened window, change the state to Active and the counter value to zero, then click Save, or delete the counter.
|
|
See the description of web interface pages here: Network and Connections |
1.Open the Network page (the System configuration group) in the web interface.
2.Click on the Change Core IP button and write the IP address of your IPTV Core server.
3.Restart the server to be added to the cluster.
4.Open the Services page (the System configuration group) in the IPTV Core web interface and restart Cluster service.
5.In the IPTV Core web interface, open the Connections page (the System status group) and make sure that the required server appears in the list.
1.Open the DVB to IP gateway page (the Streaming group) in the web interface.
2.Click on an input panel to expand it and access settings.
3.Enter transponder parameters in one of the ways:
–Select Input mode (DVB-S, DVB-S2, DVB-T, DVB-T2, DVB-C Annex A, ISDB-T) and fill in all the parameters manually. Each of Input modes has its own set of parameters, and the list of available modes depends on the DVB adapter type. For more info, see Input modes.
–Get transponder settings – click on the Get transponder settings button on the right and select the option: Satellite database or Browse network. In the opened window, select one of available transponders to fill in the form using its parameters.
|
|
Browse network is available for DVB-S and DVB-S2 |
–Select a preset from the saved presets list. For more info, see Create and edit a preset
4.Press Apply. As a result, the panel displays input signal quality indicators and the list of programs for the selected frequency.
|
|
You can assign a name to the input. |
5.Select one of the available channels and open Stream setup window to add output streams.
6.Repeat 3-5 steps for each input.
|
|
See the description of web interface pages here: TV Channels and Service plan page |
1.Connect the device’s DATA output to the network that you are going to stream.
2.Start streaming from the device and make sure that it can be played back inside the network, e.g., with VLC. Keep in mind that VLC requires a ‘@’ before the IP address of a media stream. E.g., udp://@225.1.0.25:1234
|
|
Setting up, you should use an unprivileged port (e.g., 1234). Using a privileged port may cause playback problems on some devices |
3.Open the TV channels page (the Media content group) in the web interface and create a media content for each of the streamed TV channels (see Add a TV channel ).
4.Add the created media content to a service plan (the IPTV => TV channels service) and attach the service plan to customers.
|
|
You can combine media content into groups. For more info, see Combine media content |
|
|
See the description of web interface pages here: Processing presets and Processing setup |
1.Open the Processing presets page (the Video stream processing group) in the manager web interface and click Add preset in the upper right corner of the page.
2.In the opened window set up settings for stream processing and click Save.
3.Open the Processing setup page (the Video stream processing group) in the manager web interface and click Add input in the upper right corner of the page, and select a stream type.
4.In the opened window fill in the fields and click Save.
5.On the Processing setup page, find the created input stream and click on it.
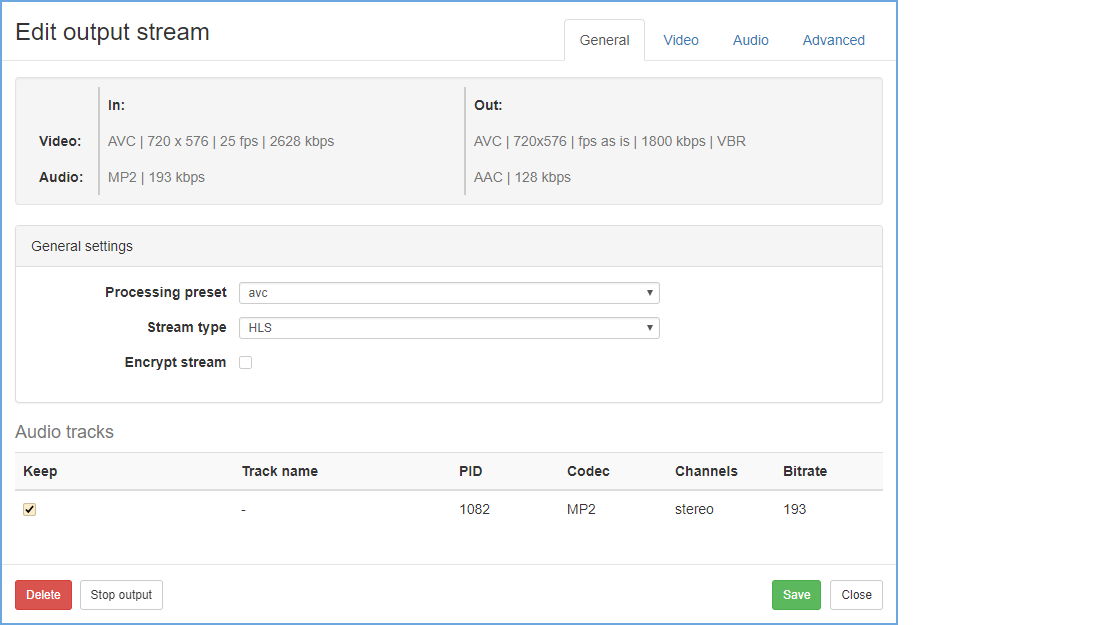
6.On the opened Manage output streams page, on the Output streams panel, click Add output.
7.In the opened window, select the created processing preset, if it’s necessary, edit video and audio setting for the stream and click Save.
|
|
Adding the output stream, you can change processing settings on Video and Audio tabs. This changes does not affect the preset. |
|
|
See the description of the web interface page here: Processing setup |
1.Open the Processing setup page (the Video stream processing group) in the manager web interface and click Add input in the upper right corner, then fill in required fields and click Save.
|
|
If you need to set up a CatchUP service for an existing stream, find it in the list and left-click on it |
2.On the opened Manage output streams page, on the Output streams panel, click Add output and create the HLS stream or select an existing HLS stream.
3.In the Add output stream window, open the Advanced tab and specify Storage duration option in hours. Click Save and copy the output stream address.
4.Open the TV Channels page (the Media content group) in the web interface and create a TV channel profile (or open an existing one) for which you need to set up a Catch UP service. For more info, see Add a TV channel
5.Paste the output stream address in CatchUP source and save changes.
|
|
Make a change to the copied output stream address. |
6.In the manager web interface, open the service plan for which the CatchUP service will be available, and add the ‘TV channels service in the record’ to it. For more info, see Create a service plan
7.Turn on a STB, go to the TV Guide and make sure that the icon ( ) appears opposite the channel. For more info, see TV guide